Invalidate All Cloudfront Files From The Command Line
 As I mentioned before,
this website is built using
Jekyll
which generates static html which is then hosted on
AWS S3.
This works great for me because it allows me to take advantage of the enormous capacity S3 offers while paying pennies per month for hosting and bandwidth. All the while I get to skip worrying about spinning up web servers, virtual machines, etc. I do love doing all that but not for a simple static website such as this one.
Having said that, you still need to separately set up an AWS Cloudfront distribution in front of your S3 bucket to manage caching at AWS's edge locations around the world, and it's also required to allow you to use SSL certs generated from the AWS Certification Manager.
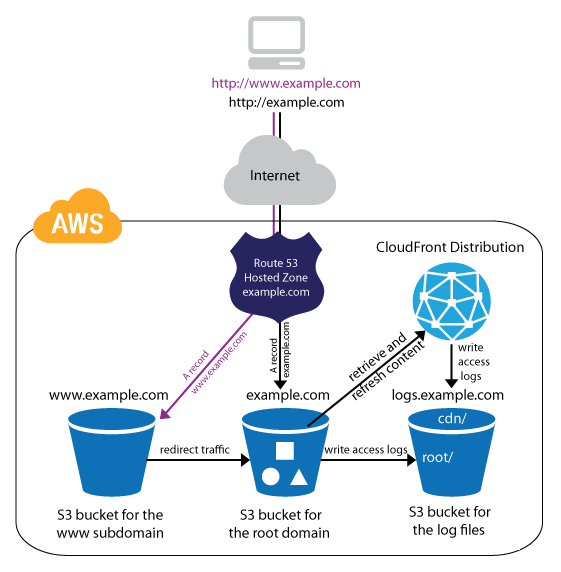
One problem I was running into was that once I deployed a new set of static HTML to the S3 bucket that hosts this site, Cloudfront would not immediately pull the new data into it's cache at all its endpoints. You can set up reasonably sane TTL settings on your Cloudfront distribution to semi-alleviate this problem, but for me, I want to see my changes as soon as I finish deploying.
After looking at the Cloudfront documentation on invalidating a distribution's cache, it wasn't really clear how to invalidate ALL files that were cached from the S3 bucket, so I wrote a quick bash script to make it easier.
Hopefully this is helpful to someone...
Invalidate All Cloudfront Cache Script
#!/bin/bash

# This script issues a new invalidation request
# for all files on a cloudfront distribution

AWS_PROFILE=MY_AWS_CERT_PROFILE
DISTRIBUTION_ID=MY_CLOUDFRONT_DISTRIBUTION_ID
DATESTRING=$(date +"%Y-%m-%d_%H-%M-%S")

JSON_STRING='
{
  "Paths": {
    "Quantity": 1,
    "Items": ["/*"]
  },
  "CallerReference": "'$DATESTRING'"
}
'

echo $JSON_STRING > /tmp/invalidate_cloudfront.json

aws cloudfront create-invalidation \
  --distribution-id $DISTRIBUTION_ID \
  --profile $AWS_PROFILE \
  --invalidation-batch file:///tmp/invalidate_cloudfront.json

rm /tmp/invalidate_cloudfront.json
The line "Items": ["/*"] is the key to specifying that all files need to be invalidated.
Note that you need to replace "MY_AWS_CERT_PROFILE" with the name of the certs profile you've defined in ~/.aws/credentials and you need to replace "MY_CLOUDFRONT_DISTRIBUTION_ID" obviously. If you haven't set up your credentials in ~/.aws, read the docs on using the AWS command line tool
To: @mattccrampton
0
Other Posts

When exporting photos from a service like Flickr, perhaps after they've given notice that they're going to delete our photos if you don't subscribe to......
All Truthy and Falsy Javascript Values In Nodejs, every value has an associated boolean, true or false, value. For example, a null value has an......

Google Forcing Nest Cameras Visual Indicator Light To Be On Received the following email from Google today... Full email text... Recently, we shared our commitment......

Posting to Twitter with Python - Part Two: Posting Photos NOTE: This is part two of my posting to Twitter with Python tutorial. If you......
Doubleclick to open a file in VIM from OSX I use VIM for just about everything from note taking to coding to keeping track of......

Sign Into Gmail Without Signing Into Google Chrome Unfortunately, Google has made changes to Chrome since this blog post was posted which removed the options......
Other Software Development Blog Posts







Other Blog Posts


Media Appearances


Print Interviews


